Frottage faces
Drawing faces can be difficult, even for experienced artists, but through using simple cardboard raised templates of eyes, nose, mouth etc., participants can use wax crayons to make rubbings, or to use the art term, ‘frottage’, to create a complete and unique face which they can add details to. Though simple to do, the finished faces are full of line and contrast shading and can look very sophisticated.
Materials Required:
For creating the ready-made face element templates:
- Cardboard (old cereal boxes are great)
- PVA glue
For doing the frottage:
- Wax Crayons
- A3 paper (not too thick)
Step by Step Guide:
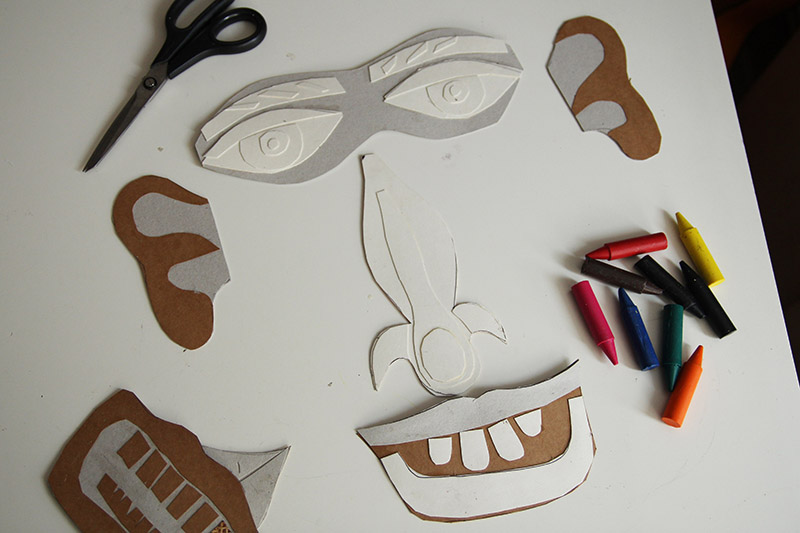
- Readymade face elements are created using cardboard built up in 2, 3 or 4 layers. E.g. The eyes will be ovals on the bottom layer, the next layer will be the round iris’, then the final layer will be the pupils. Add in eyebrows and eye lashes
- Glue the layers together with PVA glue. They can be used many times.
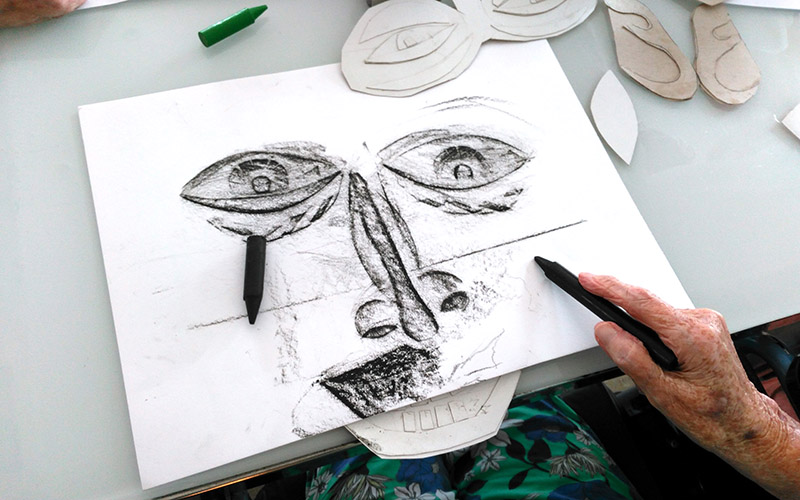
- Have your paper in portrait orientation and start with the eyes. Participants position the chosen eye template about 2/3rds up their page but under the paper. Keep one hand on a corner of the paper and gently peel it back to make sure the template is nice and level and not skew-whiff, replace the paper.
- Keeping the paper nice and still with one hand, or a helper, rub over the template with the side (not the point) of a wax crayon. See the edges and shapes of the cardboard eyes start to appear. If you keep the paper still, you can keep adding more and more shading until you’re happy. When the eyes look as you want them, remove the template and add the nose. You could tape the chosen templates in place on the back of the paper.
- Position the nose template in its natural position in between and below the eyes. Again, gently peel the paper back to make sure it’s in the correct position before using the crayon on it.
- Do the same with the lips. After you’ve used the black crayon, keep the template in position and use the red on top, this can look effective. Then add ears and hair (you can make templates for both straight and curly hair).
- Finish off by getting participants to add an oval line right around their face with crayon. They can add a neck and details like jewellery and shirt collars etc., to make their face more individual.
Ideas for Further Activities with This Idea:
Participants could be encouraged to draw, cut out and glue their own face element templates together; it could then be fun for a group to share different templates and make new ‘mix-n-match’ faces.
A further extension to making individual faces could be making a large mural type piece with lots of faces with added bodies and animals etc., which could, for example, be based on a poem or part of a story.
Adaptability
Ways to adapt for less able residents:
The beauty of using ready-made templates is that pretty much anyone who can hold a crayon can have a go at making Frottage Faces. If applying physical force with a hard crayon is problematic for a participant, try using softer oil pastels or charcoal.
Ways to adapt from group to individual and vice versa:
Individual faces can be brought together and glued to a larger mural type piece of paper to make a group artwork. It’s fun to talk through what characters will be made beforehand, perhaps with reference to a poem or story, so that participants can add relevant details to their images as they make them and so that they have a sense of working to a larger end goal.